Showing posts with label crates. Show all posts

Sunday, November 12, 2017

Asbestos crate (#4 of 4)


My girlfriend hates her kitchen floor.  And now, we find ourselves here.

She hated that floor and complained about it all the time.  Until she struck a deal with a friend of a friend who does remodeling (and put a new roof on her house), and they came to an agreement of barter for labor, if she would buy the tile.  Her and I headed to the store and bought 90 tiles (those were heavy!) and a few weeks later, he put them in.

This left behind a large amount of scrap which included not just the old crappy peel/stick linoleum but two separate subfloors (replaced with cement board) and two more layers of old tile beyond that from god knows when.  I agreed to help dispose of this at a (legal) site I have access to so I dragged the stuff away.

This was the 'farewell' photo I sent to my girlfriend as I dumped the refuse into the bin.
After I dumped it and somehow avoided getting stuck with the literally thousands of 6" nails that stuck through the bottom of the plywood, I got to thinking about how I wished I could have salvaged some of it.  I salvage lumber all the time and this was a lot, but alas it was coated with old tile and had so many nails and staples in it I didn't know where to begin.

Then I got to thinking about how maybe I could salvage just enough to build a crate.  How bad could that be? You can probably guess the answer ("pretty bad").  Also, long ago I began a series of four crates.  I never made the fourth because I got a hold of a nice locking box and that filled the last spot in the shelf.  So really, I don't even have a place for this.  But my OCD was intense that day, so off to work I went.

I figured I needed roughly five pieces 12" x 12" which would give me more than enough to work with.  The contractor had taken a circular saw and set the depth to go through all of this mess down to the joists and he cut it into random pieces but many were probably double what I was looking for.  So I pulled out enough square footage and got to work.

Notice the distinct layers: the thick original subfloor, covered with blue, then white tile.  Then the second subfloor with the newest white tile.
First thing, I decided what I really wanted was the old, original subfloor.  This was some kind of really old and really thick plywood.  So I bashed a crowbar between that and the second (much thinner and crappier) subfloor and pried them apart.  Of course there was so many nails and staples holding it together it did not come apart cleanly so I did my best then picked the bits and pieces off.

Next step was to try and remove the nails.  The nails were used through this old subfloor (which may have been from the 40s or 50s) down into the joists.  Then two layers of tile (which I wanted, more or less) was laid on top of it.  So I could tap the nails out but it would crack like perfect bullet holes through the tile.  So after a spell, I got all those out.

Next were the staples, if you want to call them that.  Someone must have had a (at the time) new fangled staple/brad gun and just went berzerk, blasting thousands of the things through and they were LONG.  For a time, I gave up on it and decided they could stay.  But it drove me crazy so I eventually figured out a method using a very thin screwdriver and a hammer, and another larger screwdriver and a pilers.  I would work the staple out just enough that I could grab it with the pliers, then use the larger screwdriver handle as leverage to pry it out.  This led to me smashing my knuckles on the wood about 200 times when the staple would fly out.  Many of them broke and had to have their individual tines ripped out one at a time.  I thought it would never end.  But like all things, it eventually did.

The rest came easy.  I cut it into my shapes as I have done so many times before with a sawzall.  Then I used my Kreg jig to screw them all together.  I did some minor sanding (not on the tiled side) as well.  I elected to keep the tiled sides on the inside for the back and bottom so they would be seen.  The rest I did on the outside.  Funny since no one will likely ever see this thing but myself.

But funniest of all is that when it was done I was showing it off to a coworker and he mentioned that the old tile might have asbestos on it.  I commented that I wasnt' worried, it isn't like I rubbed it all over my body or something.  He said he agreed, it was only really dangerous once it becomes airborn.

Like if you sand or cut it with a saw.   Yikes.


Thursday, March 23, 2017

Throwback Thursday!


I dug up some old pics of my set up from a few years ago when my collection was smaller and my system was kind of screwy.  I already revealed in another post a shot of my set up previous to this one, with the old beat up 1200s and Vestax mixer.  The image above is from 2010.  The turntable you see is an Audio Technica which I paid about $100 for at Best Buy at least 10 years ago.  I actually had it previous to the 1200s, then put it in storage.  Then I dumped the 1200s, the mixer and an old stereo with speakers I had in the other room on Craigs List.  I used the money to buy the speakers you see here, which I think I paid about $150 for (again, at Best Buy).  They are Insignia NS-82111s and I still have them today and they still sound great.  The Kenwood receiver you see below I also still have, I got it from a guy that used to live in my building who is now unfortunately no longer with us.  It is an absolutely great unit that I've had for a long, long time.  I gave my girlfriend the turntable at least two years ago and I listened to it as recently as this week.

The woofers are R-F 12s as you can see, once upon a time I had a decent system in my car (I don't even have a car anymore and haven't for almost 10 years).  I eventually sold all the components, mostly on eBay (where I bought some of them) after my head unit got stolen and my dash got all messed up.  I never sold the 12s because they were way too heavy to ship.  They were blown and I got them reconed at a place on Diversey in Elmwood Park a long time ago.  Then about 3-4 years ago, I signed up on a message board with audiophiles asking for an easy way to crossover the high frequencies out of them (as the receiver does not have EQ or a subwoofer channel).  I bought some really cheap parts from Parts Express and soldered them all together.  On top of the subs is an 8-track player from a period where I got into dissecting 8-track tapes and rebuilding them, I still have a small collection, this player died but I have another (which is not currently hooked up).  On top of that is the remote for my receiver (which I never use as it is arm's length from where I am sitting right now, same as it was then) and behind that is the transmitter for an ancient wireless speaker I no longer have.  It was an outdoor Advent speaker which I bought on ebay and had for at least 10 years.  I had it setup in the bathroom so I could listen to music while I took a shower.  The sound was pretty poor and sometimes the signal would break up.  Worst of all it was a giant green 'orb', everyone used to come over and be like 'what the hell is that'.  It ran on a DC adapter but it also could take four D batteries and even recharge them.  You had to actually take the whole thing apart with a screwdriver to change the batteries.  I eventually got sick of looking at it and didn't really listen to it anymore so I dumped it at an electronics recycling spot.

Obviously, I also eventually ditched the ugly, beat up folding table and also built some racks for my vinyl.  The pic below is from 2009.  As for the vinyl, what you see here are 14x14x14 boxes from Uline which work great as 'poor man's crates'.  You can even see that in the two below pics some time has passed as the stickers are different.  On Box #2 is the retail promo sticker from the 'Rise' LP promoting the single.  It's adhesive just died one day and the sticker fell off so I taped it on there.  I still have one of those boxes which I have some tools in and other random junk.  I estimate the collection was no more than 200 at that time and probably less.  In both pics it looks like box #3 was my hiphop vinyl and box #4 was my Stones Throw vinyl.  Looks like maybe 'Lincoln' is in the front of box #1 in the first pic.


Sunday, October 16, 2016

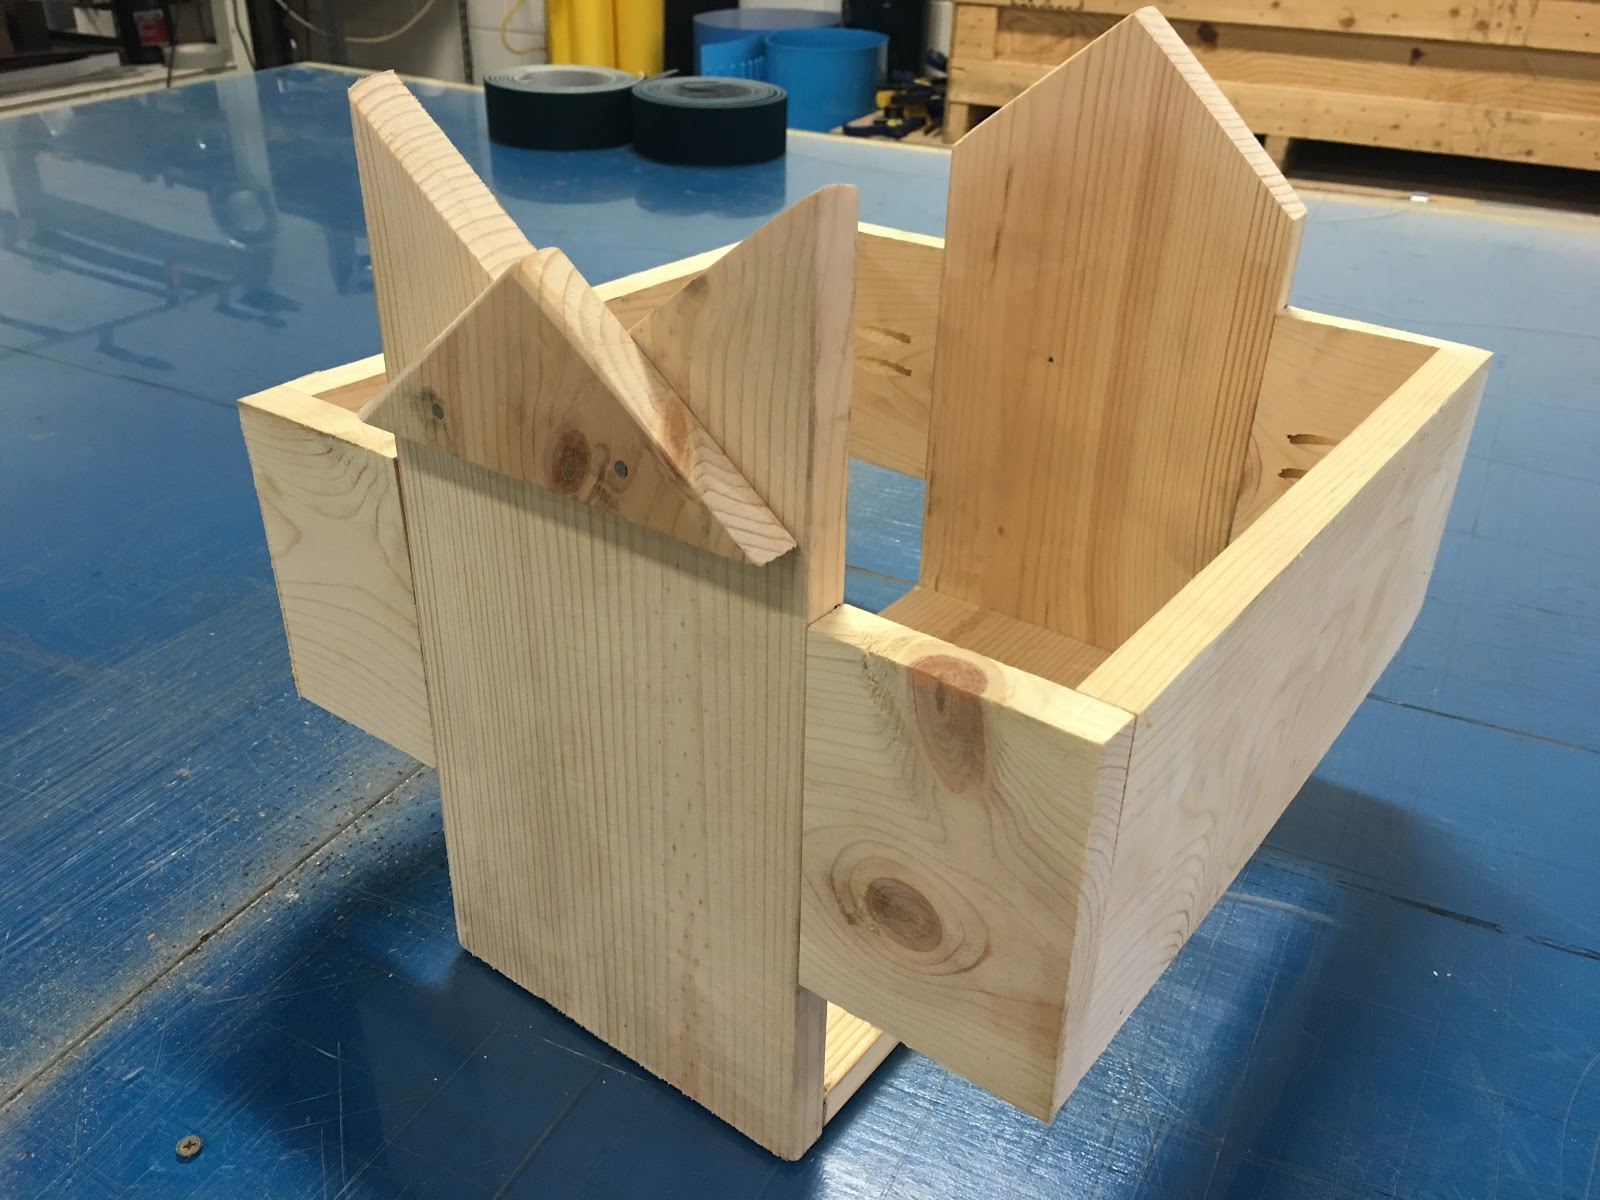
'Triangle' crate (3 of 4)

So I continued on with my journey to create four competely irregular, asymetical crates to be stored, two by two, on a shelf in my living room where my old television used to be, which is now in an electronics recyclery or a landfill.

With this bin, I wanted to incorporate triangles.  The simplest approach it seemed to me was to use these triangles as the sides of my bin.  A right triangle, specifically, seemed well suited to a record bin with the square back, high rear (to support the records) and low front (to show the jackets).  I already used my chop saws capability to cut angles on my last bin so I figured this would be a piece of cake.


I remembered the Pythagorean theorem from high school but we only used it to calculate the edge lengths - but now I needed the angles as well.  I found an online calculator rather quickly and started experimenting with it.  It didn't take long to determine that this was going to exceed my saws capacity for angles - it is limited to a 45 degree in either direction.  However, shortly after that (through experimentation) I found that if edge A and edge B are the same length, both angles are 45s.  So that would work just fine and I decided on 12".

So I figured this would be a very quick project...I measured and cut my pieces then determined I had to take into account the added lengths of the connecting pieces.  This is easy to calculate until you take into account edge C, where the added lengths come at a 45 degree.  I'm sure there is a carpenter reading this now and laughing at how simple this is and the fact that I am figuring it out all alone.  Laugh away.

So I had to sit down and draw this so it made sense in my mind.  At this point I could see already that the pieces were not fitting together very well at all, the angles were off.  Or were my edges not precisely cut and that threw things off? So I switched to metric so I could measure in millimeters (I am more comfortable in metric anyways due to my occupation) and I grabbed a protractor to check my cut angles.  They were off! So then I tried to fix that with a belt sander and coping saw.


After many cuts, I finally got pieces that fit together, at least well enough that I knew the screws would pull things together.  But pocket holes on stock this small, plus the angles made that tough.  I looked at my options and selected what seemed to be best and went to work.  Finally - I had one side.  Now to make another.

A short time later, that was done.  Now what? I didn't know.  Again, I can't draw in 3D so it is tough to have a 'plan', I just dream it then try to execute it.  So I had to attach the two sides somehow, at a width of at least 13" to accommodate LPs and their bags.  So the thing that made the most sense was to put a beam across the back, down low.  But I had pocket holes down there connecting the edges of my triangle.  So I did it mid way up the back and figured I'd come up with something after that.

Then I was stuck.  Really stuck.  I couldn't figure what to do next and I've never been stuck this bad before.  For starters, my crate needed a bottom and I have become fond of NOT using a piece of plywood for this.  I do not want any of my four crates to use anything but 1x_ stock and I'm not about to change now.  But what the hell would I attach it to? I have 1x8 and 1x6 but how do I connect it.

After much deliberation, I cut my bottom and then carefully put a 45 degree on the front of it to match the angle of the front of my crate (the lower angle on both triangles).  I cut it a little longer than I needed and figured I'd clean it up later.  The crate also needed a 'lip' to hold the records when they are leaning backwards. So I first cut a piece that went across the whole front, and I used nails to attach it (2 on each side).  But it was really ugly to have the exposed edges of the stock so I got mad and tore it off.

Then I figured I could attach a lip to this bottom piece, but alas, yes then it too would need to have its bottom cut on a 45 or at least roughed off with a belt sander so it would sit flush on whatever surface it is perched upon.  I started with the belt sander but determined it would take a long time so again I used the sawzall to cut (rip, actually) a 45 off the bottom edge.  I experimented with a few different width 'lips', at first considering a really narrow one (~5") thinking that is more than enough to hold the records back, then I decided to do full width and cut it a little over so it would be tight.  No way to use pocket screws for this, so I bored a screw in from each edge to secure it.  This would haunt me later.

Now all I needed to do is to attach the crate bottom to the back beam.  This was easily done with a short piece of stock and pocket holes on both sides to secure.  This was when I realized that I had forgotten to trim the back of the crate bottom off, which was jutting out of the back.  I tried a few methods to trim it off until I used the sawzall carefully (and dangerously) and cut it off, then sanded it flat.

The next morning I was disgusted with use of screws on the outside of the crate and I realized that with the tight fit, this was a great application for nails.  So I removed the screws and bashed in two nails on each side.

In the end, this is more of a work of art than a functional record bin, but I don't really need anymore record bins anyway.  This is free/salvaged stock and it isn't just general use pine (I can smell when I cut it, it's something fancy) so I am not going to finish it with paint or stain or anything at all.


Thursday, September 29, 2016

'Laser Beam' crate (2 of 4)

So I have continued my work building four crates to move some of the weight of my vinyl collection out of my office and across the floor plan of my condo.  When you worry about your record collection busting through the floor due to it's mammoth size....yeah, you have a problem. However unfounded my worries may be.

So I discarded (recycled) my old CRT television in the living room, I had not watched it in years.  I watch the TV in my bedroom where I have an antenna hooked up and my DVD player connected.  It had to have weighed 125 lbs.  I carried it (somehow) down 2 flights of stairs and across the street to the electronics dump in my village.  It was brutal.  But now I have room.  I have two shelves open to hold two bins each.  Bin #1 stores my CTI 3000 and general CTI collection.  This bin - named the laser beam bin due to its use of angles - currently holds my polka collection which isn't very big but growing.

So as referenced above, I wanted to incorporate some angled cuts on this one.  My chop saw has a jig to accommodate all angles so I tried to figure out the best way to put some simple 45 degree cuts into the mix.


I notched the sides of the lower part of the bin manually with a hand saw.  Alas, I may have been a bit ambitious as it is not a perfect cut.  But I suppose it is perfect enough, I acknowledge I may be peering at the thing through a microscope since I am naturally critical of my builds.


Again, I used only 1x4 and 1x6 and total lumber cost was only about $20.  I tested the limits of the Kreg jig as often it was difficult to find a place that I could use it on small angled sides.  Again (the last time!) I stained the box but this time I tried to do a lighter coat and really worked to rub away any excess.  It is an interesting look no doubt, a contrast to the heavy layers I applied on my other works previously.  I am looking forward to trying some new varnish or stain, etc on the final two boxes.  I already have some free lumber lined up....stay tuned!


Sunday, September 11, 2016

'Bird Skeleton' Crate (1 of 4)


I have been wanting to make another box for a while now.  I am a bit worried about all the weight on my record bins and hutch.  I estimate that the two actual pieces of furniture are 250lbs at least and the 600 records and 100+ 45s has to be at least 750lbs.  Besides, I really wanted to drag my CTI 3000 series out of there and put them in their own bin.  

I have been wanting to try and build a different kind of bin for a while, one that does not use plywood and just uses 'rails'.  The records don't need to be fully enclosed, so why use all that excess lumber?  Also a solid 1"x___ will be infinitely more drillable and can take screws better.

Even more fun is the fact that I recently got a beautiful new chop saw at work.  We needed it for cutting something at work but I instantly knew I could use it for a project.  It came with a grinding disc for cutting metal which had to be replaced anyways.  So I got a nice wood blade which is perfect for what we are doing with it and of course it's great for lumber.  I have been using it for a few weeks at work and I was blown away at how well it cut the 1x6 and 1x8s I bought today! The finish on the ends is better than if you sanded it and of course - finally - I know that my cuts are perfectly square because there is a mechanism that locks it down.  And I can cut very precise lengths because I can see exactly where the blade comes down and I know how much I will lose in sawdust.

So I of course screwed up a few things, one of the biggest is that I miscut the side rails.  I could shorten them of course but I had already tapped them for my pocket holes and I wasn't going to cut the whole area off.  So I lined things up the best I could and besides being a little ugly (and its largely hidden), it did not effect anything.  But I did finally build something with all my pocket holes hidden! I just barely got the drill in there for the last couple but it fit.  So all the holes are on the inside or on the bottom.

It only took me about 90 minutes to do the whole project, I was designing on the fly.  I can't draw in 3D so I have to just go by my brain.  When it was done it looked boring and too square.  So I cut the 'V' and the point by hand with a finishing saw.  Then I nailed the cut away piece on the front.  I sanded the hell out of everything which of course did not need much since again, for once my cuts are all very square.  But I should have just cut a quick 2x4 brace before I nailed that piece on the front, I very marginally knocked something just a touch out of alignment from whacking at it.  I couldn't figure out how I missed sanding a few joints then realized I did - but there were knocked just 1-2mm out of square by my hammer swings.  It is very minimal and as you can see, the box is not bent or warped.  But I do have a pile of 2x4s and 2x6s and should have cut one.  Live and learn.

Again, I used a basic stain because I really like the look and of course the application and use is exceedingly simple.  And I spent $9 on that can and everything I build will get that finish until the can is gone! I am already planning another crate, to be built in as soon as a week, as I already have some design elements banging around in my brain and I need to get them out.

Best of all is that I just made another trip down to Bel-Aire in Bridgeview, one of my favorite places in the world.  They DID have the record I needed to match the sleeve I already have.  I also picked up both of the albums by The Tones - I've played through both already, a few times and I am very pleased.  Glad they could be modeled in my finished work below.


Wednesday, July 6, 2016

45 Crate


I have experimented with my Kreg jig on and off and demonstrated its use at a talk I gave regarding crate construction a while back.  The simple 12" box I built (without lid) I gave away/sold at that event and I've been aching to put something else together.

We visit my girlfriend's mom a few times a year at least which consists of me vegetating on the couch and watching TV, running the grill and drinking beer.  I have no doubt that she does in fact not mind this oafish behavior and enjoys our visits but I always feel like a freeloader.  So as she is a big music fan I thought it would be nice to get her a portable record player and a bunch of vinyl as a surprise gift because I know she would flip out.  But of course there is no way I can gift someone anymore than a single record without building them a box.  So I began to engineer a box in my mind which would use hardware (something I've never done before) and had a full opening and closing mechanism.  I decided to do a 7" bin and see how many 45s I could round up for a nice start to a collection.

I had a shipping crate made of 3/4" boards, really sturdy nice stuff.  Ironically I originally intended to reuse the crate to ship something back out in but I realized it was badly damaged and wouldn't work out.  While the Kreg can indeed work with as thin as 1/2" stock, everything has to be perfect to get a solid connection between boards.  I should know - I tried and did a crappy job and threw the project in the trash.  It was a learning experience in terms of what stock works and doesn't, and using the jig in general.  So this 3/4" was perfect.  It wasn't plywood, it was solid boards.  Really nice stuff which wouldn't even need much sanding.

Putting together the intial 'walls' of the box was the easy part - I had already done this on the 12' box I did a while back and referenced above.  The lid would take some thinking.  I eventually figured out something that would work but I had a problem.  Like the 12" bin, I did diagonal cuts on the sides so flipping through the vinyl is easier and you don't have to jam your fingers inside the box.  It also looks nice I think.  But when I got my lid put together I was displeased with the look of the gaps that the lid made.  I knew that the triangles I could try to fabricate would be tough to get a good fit and even then fastening them would be very tough.  But after cutting a few and sanding the hell out of them to fit, I was able (with much difficulty) to use nails to hold them in.


Another problem was that I did not have any more pieces of material which were wide enough and long enough to serve as the top of the bin.  So I have the two piece top you see here.  This makes the function of the hinges a bit easier to incorporate as well but it does create a difficult void at the back of the box where you cannot reach inside to get your vinyl.  The best you can do is to tilt the whole box forward so they fall towards you.  A little embarrassing but I used what I had and again, I learned.

The last problem was that I did not make the width quite as wide as I would have liked.  I have made this mistake before.  It isn't a math error, I just did not account for the added width that plastic sleeves add.  The records themselves fit fine, even with generic paper sleeves or picture sleeves they are OK.  I don't think my girlfriend's mom gives a rip about plastic sleeves and would probably scoff at them anyway, but I need to take measurements before or just give a full extra 1" beyond what I think is necessary, this has come up too many times before.  When will I learn???

Like the 12" crate, again I used stain.  First of all, I have tons left.  Second of all, stain is much easier to work with than paint - and I LOVE the look.  I think I could have hidden some of the pocket holes inside the box (not all) but I think it looks kind of cool.  One of my favorite features is on the back of the box, there is some kind of international marking that says 'HT" with some symbols.  This illustrates that the box is heat treated so it can be used for international shipment (heat treated wood won't have bugs living in it, or something like that).  Paint would have covered it, the stain only highlighted it.  I love it.


I went through my 7" records and pulled out a load of duplicate Tom Jones and Engelbert 45s, I think 11 in all.  Including some pictures sleeves for both singers! Then I went on discogs (with my girlfriend's advisement on her mother's taste in music) and found a seller with a couple thousand 45s for sale and we bought 8 for about $20.  All are Very Good or Very Good +, so that is definitely a good price.  The Herman's Hermits is a picture sleeve as well.  My girlfriend also went though her own collection and donated a handful - some of which were actually her mom's from long ago that she inherited when her mom no longer had a record player! I believe that is called 'Full Circle', folks.  So I think we have about 20 in there in all.


We got the player earlier in the week after doing some research on Amazon.  This one had over 2000 reviews and was only about $50.  The sound isn't amazing but who cares? My girlfriend had it delivered to her house (she has Amazon Prime) and when she brought it inside her cat, Tom, decided he may want to keep it for himself.


Well we got it over to her mom's and unpacked it.  I wasn't present for the initial play (I had run to the store) but my girlfriend was prudent enough to think to take a video of it.  The magic is below.  Enjoy.

                                      
(for some reason blogger doesn't host videos too well - if it won't play you can also see it here)


Sunday, April 24, 2016

Vinyl Spectacular, Palatine


I was approached by the people that put this together who asked if I would put together a seminar regarding record bin construction, a topic I have covered here at length.  At first I modestly assumed that it must be some kind of prank - who would legitimately consider me enough of an 'expert' to give my opinion on the matter? Well turns out someone did, so I followed through and made it happen!

After racking my brain on what I could possibly use as a visual aid in lieu of a PowerPoint (something I perhaps have learned to use as a crutch after giving too many presentations at work) and eventually came up with what I call my 'joint tree' - it demonstrates three different ways to anchor your shelves within your build, in both 2x4 and 2x6.


I threw this together from the pics on my blog and built it in MS Paint.  The resolution was something like 8000 pixels wide.  Then I sent it off electronically to FedEx Office online where they printed me a 24x36 poster for about $45 bucks.

I celebrated my birthday for a while and my girlfriend got me something really intersting.  I had seen commercials on TV a bunch of times and she picked up on my obvious desire for the device.  It is made by a company called Kreg and it is a simple jig that you use with a C-clamp and a drill to put 'pocket holes' in boards.  It is difficult to explain better than that but the below pic should help.


I had the kit for a few weeks but never made time to take a close look at how it worked.  So I thought that it would be a good point to touch on, something to discuss for people who are maybe thinking about building something but aren't quite sure what they want to do.  So I thought I'd throw together 3 boards, just a 'corner' perhaps, to illustrate how the screws are hidden and how strong it is.  But once I got the hang of the kit, I couldn't stop so I quickly put together the box!  I decided to take it a step further and stain it instead of paint it and it came out really nicely.  This was only a single $9 piece of 3/4" CDX plywood and it took me about 30 minutes to cut and assemble.  I could do a lot better but I could also do a lot worse!


I figured I should have something to hand out to help promote the site so I went and got some cheap 7" records and put some simple labels on them with the domain name and logo.  You can see them in the box above.

At the 25th hour, I got the word that there WOULD be a projector and laptop available - so I had just the day before to assemble my presentation.  I am pretty happy with it - you can see it here

So Sunday morning with my 'business cards', LP crate, 'joint tree', power and presentation, I took the early (for a Sunday) drive out to Palatine.  The event was at Wolff's Flea Market and the market was up and running as always, the record fair was tucked away in a back corner of the facility.  I wanted to get there early enough to catch the first speaker, Nick.  His presentation exceeded my expectations on what kind of material he might cover - very interesting.  But almost as interesting was the fellow who sat next to me, also quietly listening - and eating a bag full of cucumbers! 


I was so fired up and ready to go I could hardly wait.  I congratulated Nick on his excellent seminar then spent the next 30 minutes or so trying to dig some vinyl of my own, before it was my turn to take the stage.


Well it was time to go and of course it was a blur.  I know I enjoyed being up there and I had some nice chats with folks afterwards and a few people seemed to like it too.  It was just really nice to be validated for 30 minutes out of the over two years I've been writing, and well over a decade that I've been collecting.


So I went to head out afterwards and said my goodbye to Chris who has invited me.  I thanked him profusely and offered him the box as payment after he had mentioned how much he liked it.  He refused to take it - but said he would buy it! I told him I'd be happy to get my $10 back which was essentially what I spent on materials.  I will enjoy building another and I can do better (this was basically just a prototype), so unloading it for a few bucks was a bonus.  Then he took it a step further and offered me a Vinyl Spectacular 'Crew' T-shirt! Totally gracious offer which I readily accepted.  But he wasn't done!

As I was walking out he asked if I had found any good vinyl.  I actually had not - I was pretty tired and hungover and really just wanted to get some breakfast.  And honestly, I get kind of overwhelmed at these things, when I see that much vinyl I kind of blank out everything I am looking for and become a zombie.  Well he took his new box and walked over to a table full of vinyl (apparently he was a vendor as well), and dumped the contents of a cardboard box into my box, and put it on display! Then he told the girls behind the table that I had $20 credit to take whatever I wanted! Hell, I was just happy to be asked to speak - all these gifts, it was almost too much! I swiftly found a Blue Note classic for $10 and decided to call it a day.

It was really awesome to get to chat with people and hang out - I guess I realize that I make this too much of a solitary endevour and there is a whole world out there of like minded individuals who aren't elite, and are just like me.  It was a privilege to get to speak and the gifts I received were just totally unexpected and so appreciated.  What an excellent day!